Last Updated on June 26, 2025 by George Pavlopoulos
There are multiple reasons why somebody wants to shoot street photography at night. Some people want to explore a city’s nightlife, others would like to get candid street portraits, and some prefer combining different techniques to produce moody images. No matter what sends you out into the street at night, street photography has lately received a lot of attention as a more free-styled way of documenting life.
Of course, certain ethical rules apply (for example, never expose the homeless). Night street photography is an even more demanding subgenre: the limited amount of light, combined with the camera’s limitations, makes it even more challenging to produce great images.
So, in this post, I would like to share 10+1 tips for night street photography with you. I’ll accompany them with some of my night street shots, and I’ll try to explain what worked and what didn’t work for me. At the bottom of this post, you will also find two extra sections. In the first one, I talk about night shooting and camera settings, and in the second one, I write about the street photography camera I use and the ones I’d choose for shooting at night.
10+1 night street photography tips
I’m sure that there are multiple night street photography tips out there. There’s no right or wrong approach. At the end of the day (or the night), it all comes to whatever works for each one of us. Therefore, in the following paragraphs, I will share all the tips and techniques that have worked for me over the years. I’m sure that they will help you to shoot better night street portraits and develop artistically.
Let’s start.
Accept imperfection when doing street photography at night
Accepting imperfection when shooting street photos at night will help you build the right mindset. Night street photos will never be as sharp or evenly exposed as your daytime ones. If you can’t accept that, night street photography may not be for you. You often have enough time to check the light during the daytime and decide on optimal shooting conditions. However, at night you probably won’t have such opportunities. Instead, you will be surrounded by darkness and some random light sources. Your best option is to make the most of it.
That said, some (or even plenty) of your night shots will not look sharp. You’ll have photos that seem out of focus or are underexposed. Most likely, you’ll observe high levels of noise as well. As a result, blurry or shaky photos will be the norm. And that’s okay. Accepting imperfection is a prerequisite for shooting street photography at night. There’s no other way to do it.
Instead of focusing on sharp or perfectly exposed images, think about what motivated you to start taking street photos in the middle of the night. Was it the aesthetics of the night, the darkness, or the atmosphere? Or was it something completely different? Pay attention to what the image can say. Pixel peeping and nighttime street photos rarely go together.
Search for light sources
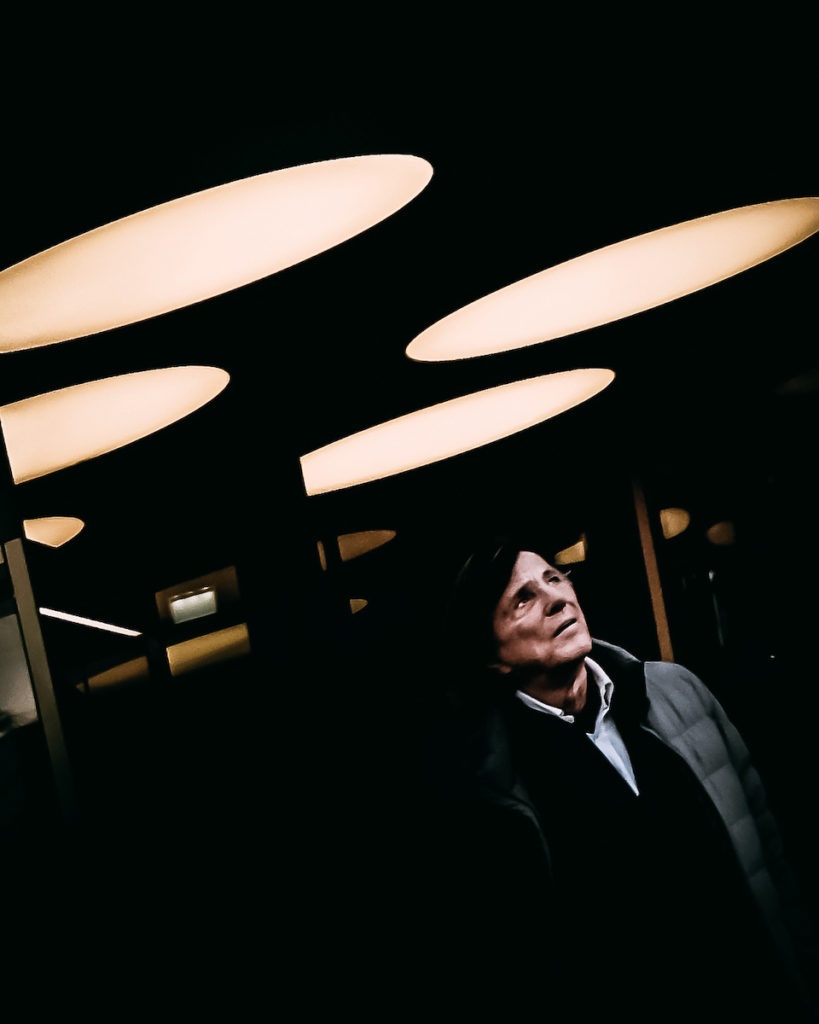
The night not only has its own ecosystem, but it also has its own unique light. It can never compete with sunlight, but this doesn’t mean you can’t take some great images. If you want to capture night shots, you should always look for an adequate light source, regardless of its origin. There are several different light sources to check: street and traffic lights, illuminated storefronts, neon signs, and the lights from passing cars. Everything goes.
After finding your light source, it’s time to compose the scene. Depending on the result you want to have, you should decide how you’ll approach the scene. For example, would you prefer silhouettes or a candid street portrait? Or, you’d rather include as much as possible in the scene?
And here’s one more tip. The photo above was taken with a very old compact camera. And yet, it was possible to have a usable image. Instead of including all available lights at the shopping center entrance, I somehow used half of them. In addition, I decided to stay in the middle of the illuminated passage, which helped me have some light on my subject’s face. That said, while you have to use the available light source, it doesn’t always mean that you have to use everything to produce a satisfying image.
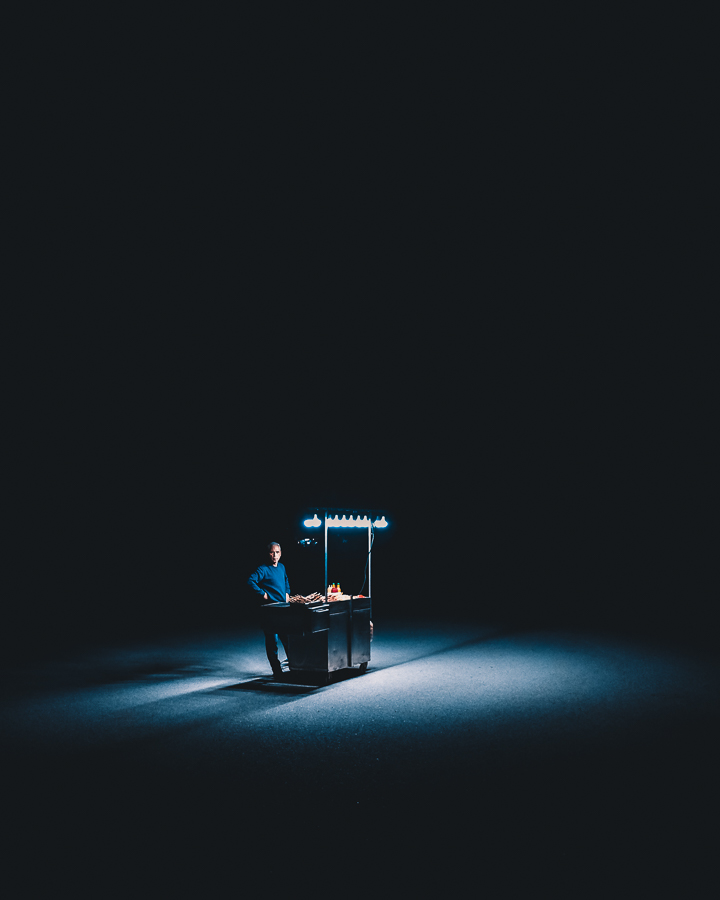
Get close for better night shots
As I wrote above, without an adequate light source, it will be very difficult to capture a proper night photo. To get even better results, it’s always a good idea to get close to your subject. For my shooting style, that’s what I prefer, both in daytime and nighttime shots.
When doing night street photography, getting close means you usually have more chances to capture interesting faces or get candid street portraits. Of course, we are talking about the night: imperfection is still your friend, no matter what you do. Blurry, out of focus, digital noise, and all that will be your friend. Still, the atmosphere of the night will be there.
This photo was taken on a cold winter day in Berlin. I visited a Christmas market, and I had behind me two big light bulbs. I stood there and waited for people to walk by. It took quite some time and several bad shots until I got the one I wanted.
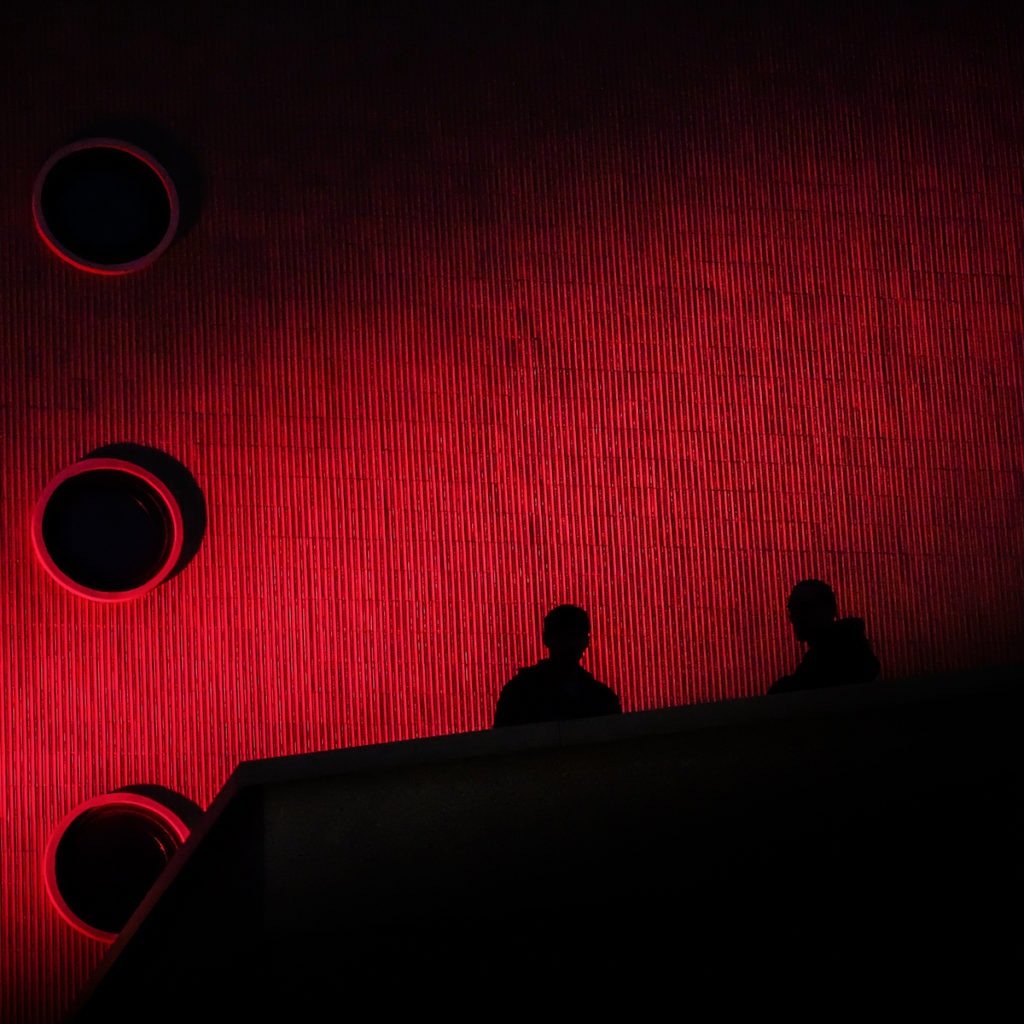
Or take a step back
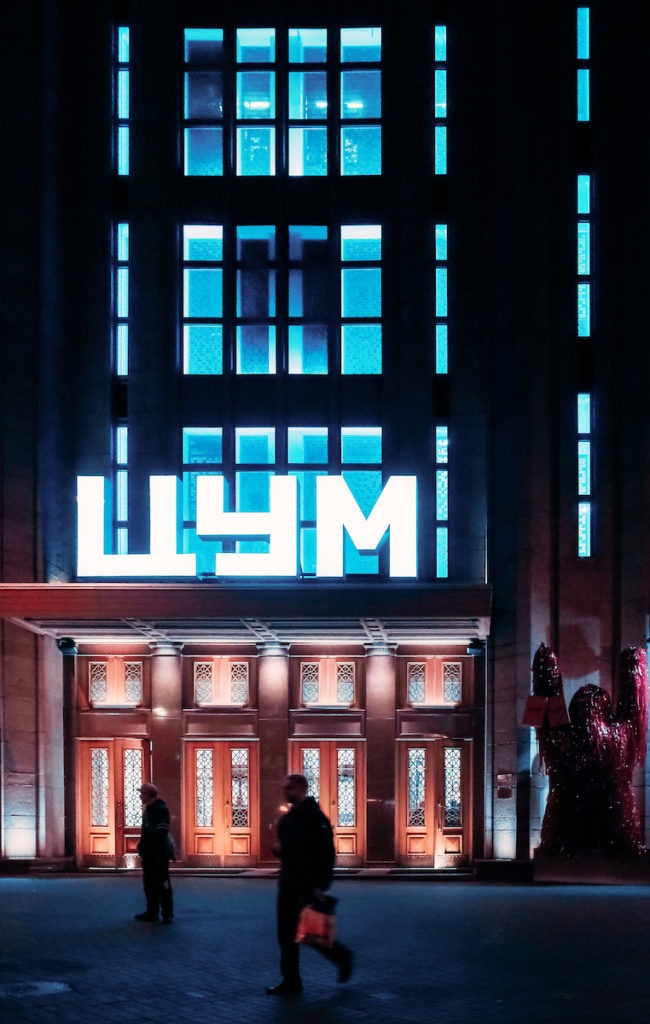
Night street photography is not always about getting as close as possible. There will be times when you want to include more things in your image. And when that’s the case, you should take a step back. Or even plenty of steps back.
For example, a nicely illuminated building with people walking in front of it might trigger your creativity. Therefore, you want to show how people interact with (or don’t care about) this building. It’s a good idea to take a step back and see what you can get in such cases. Composing such images is never an easy task, and you’ll have to work on your scene. You need to pay attention to the scene as a whole and then approach it.
I took this photo in Kyiv on a pleasant autumn night. The building impressed me a lot, and I wanted to have a couple of people in front of it. The man on the left stands still, so he appears rather sharp. However, the guy walking by is a bit blurry. That’s due to the slow shutter speed (1/30) I had to use.
Shoot through the glass
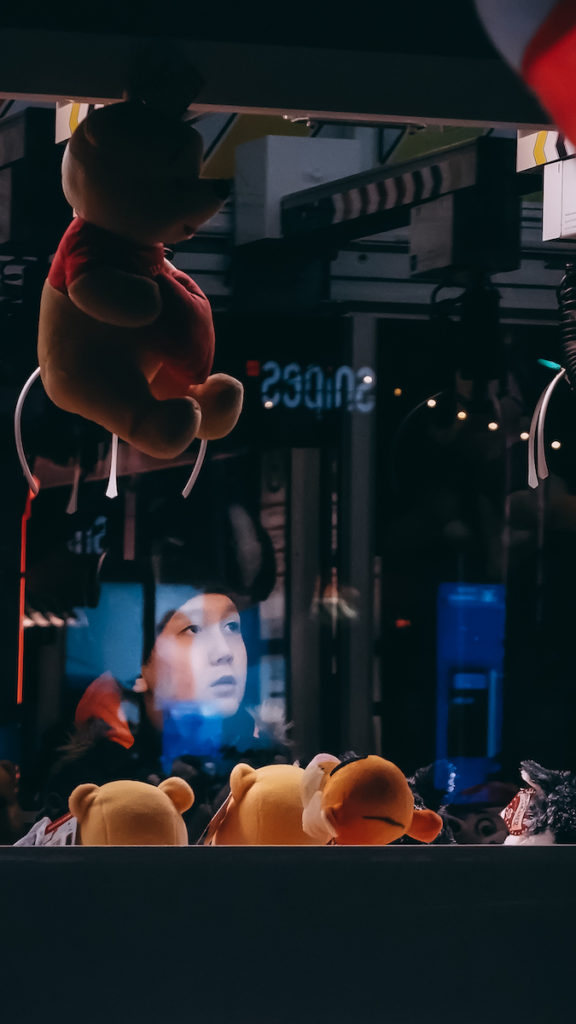
Shooting photos through glass is always pleasing for the eye. It can create interesting reflections and add a mood to your photos. This technique is particularly interesting when performed at night. And sometimes, it becomes even more intriguing due to the white balance.
When you take photos through the glass at night, you can expect interesting colors. Combining different light sources can create unique images, depending on how you handle the white balance. There’s always some magic in these shots, and if you shoot in RAW, you can also significantly alter the image in post-processing.
I took this photo in Alexanderplatz, Berlin’s famous square. There was an outdoor event around Easter time, and a teddy bear claw machine was installed. These machines were still popular, to my surprise, so I decided to take a photo.
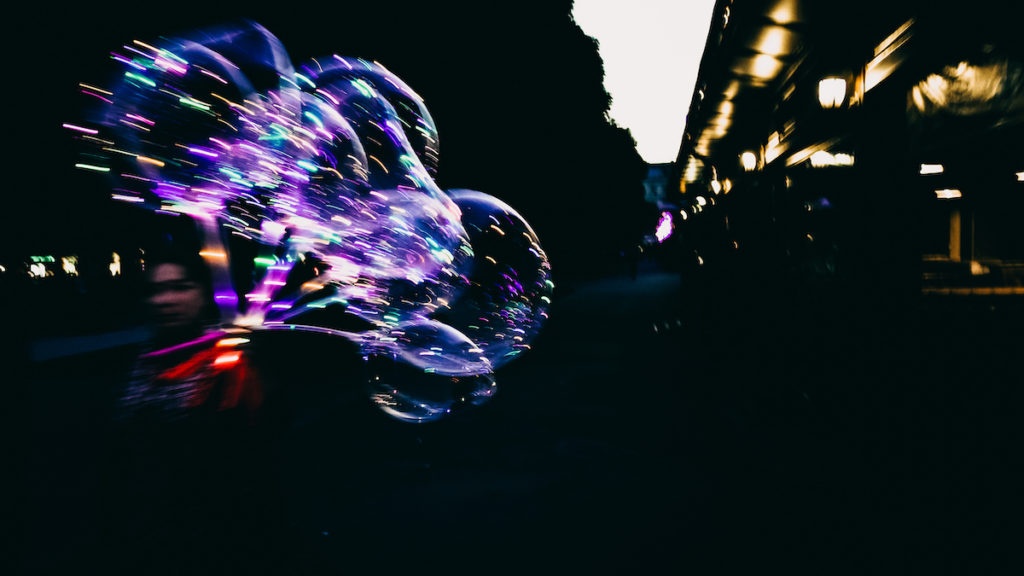
Use a flash with caution

Whenever we think about night photography problems, there’s always an obvious reply: use a flash. The truth is that a flash can come in handy in low-light situations. However, when it comes to nighttime street photography, using a flash can be challenging.
While many photographers use a flash (as seen in the work of Bruce Gilden, for example), it may not always be the best approach. Firing a flash in someone’s face is, more or less, intrusive. Imagine walking down the street, and all of a sudden, you have a flash firing straight into your face. You wouldn’t be very happy, I guess. Well, me neither.
Therefore, although using a flash when practicing street photography at night might solve some issues, be careful and thoughtful when doing it. Apart from being totally impolite, it might get you in a fight. Generally, I rarely use flash in my street photography, and when I do, it’s for more distant shots.
The photo above is one of the few times I used it. And I did that because I spotted some light trails that I found interesting. There was a team training at the spot, and it was pitch black. The photo worked pretty well; I used a very slow shutter speed of 1 second.
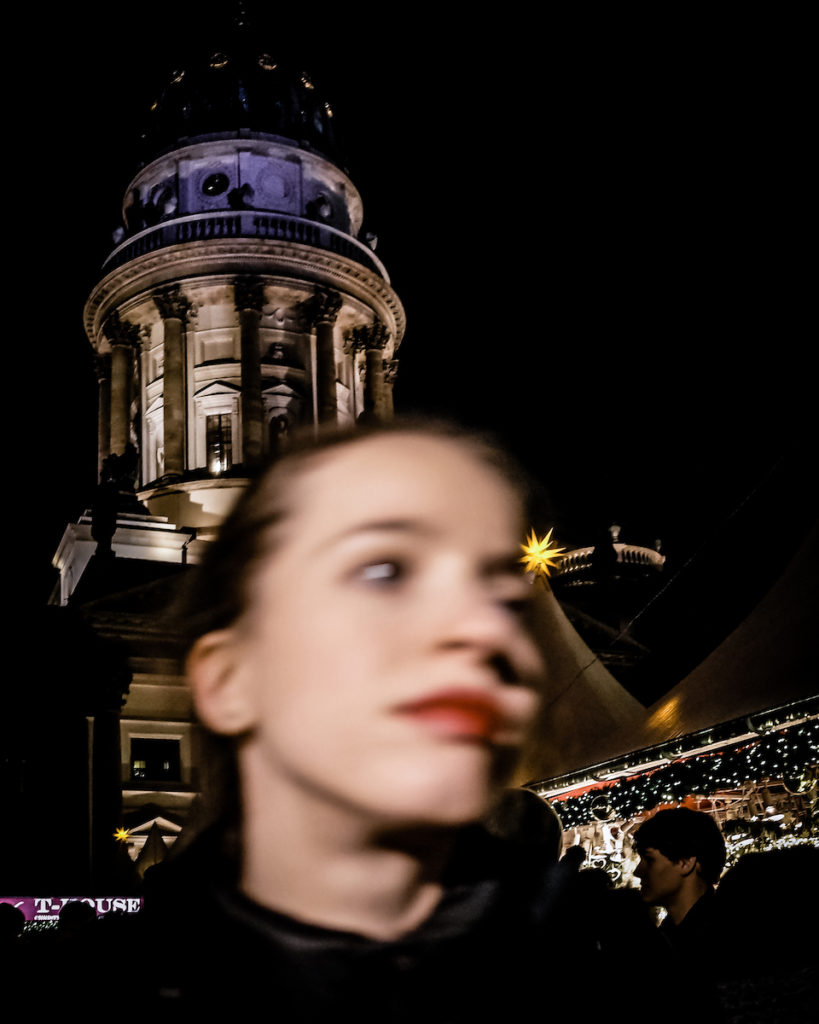
Show the city’s darkness
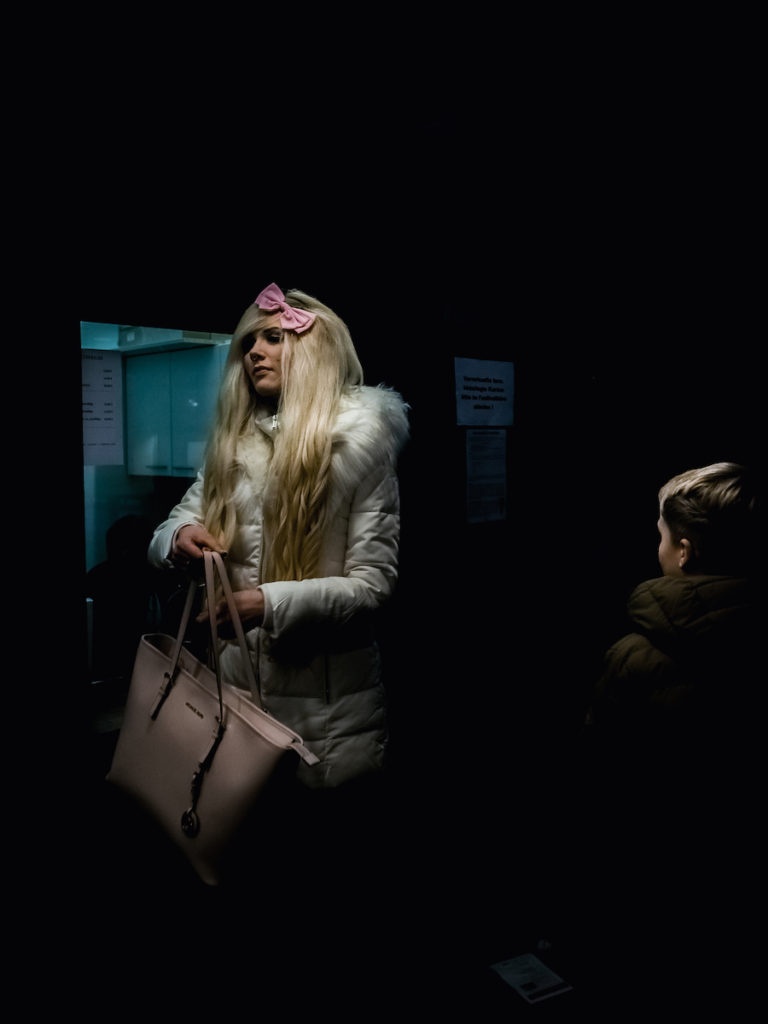
The nights are full of desire, and that’s what often makes me wander around. I find myself craving stories, and that’s why I leave my flat at night. Incidents can happen everywhere, either on a side street or outside a cinema. And by being there, I want to observe the city’s darkness and the people’s instincts.
That said, it’s not only that one should accept imperfection; it’s also that one should embrace the night. When you shoot at night, you should show the night. It doesn’t matter if it’s 7 pm in winter or 2 am in the summer: the night is always the night. It has secrets and desires, and it has faces and people moving around without a reason or a purpose.
Once I found myself outside a cinema in Berlin. A beautiful girl was about to buy her ticket. There was a very young teenager staring at her nonstop. I didn’t use the flash; I wanted the darkness around them to be visible. For the record, there was a big light straight above my head.
Attend outdoor events for practicing street photography at night
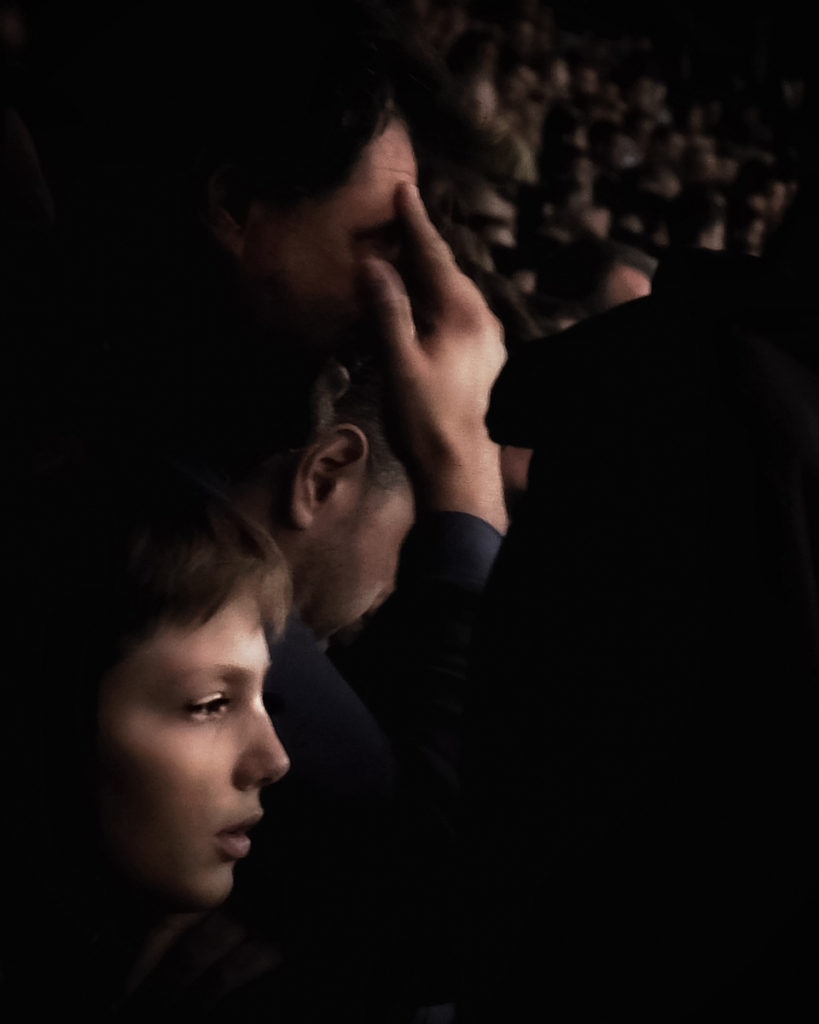
That’s actually one of the best ways to practice street photography at night -and there are a couple of reasons for that. First of all, attending an outdoor event at night means you will be among a large crowd of people. The fact that it’s taking place outdoors also means you can move around easily. Apart from the crowds, there is another crucial factor: light.
Big events are always very well illuminated. There are numerous occasions where you will be among people of all ages, from music festivals to sporting events. Of course, it doesn’t mean that you’re doing street photography by taking generic photos of the crowd. It actually means that you will have faces full of excitement or anxiety, and you’ll have multiple chances of taking photos. Even if this means that you might lose what’s really happening there (a concert, a match)…
I’m a big football fan, and whenever I have the chance, I go to the stadium. On the other hand, I never go to the stadium without having a camera with me, even a small one. In a match a couple of years ago, the anxiety levels of the crowd were high. While I was anxious, the reactions around me kept me occupied. The young guy in the photo seems engaged, while the man behind him seems skeptical.
It was a good match, though, and I’m glad I have this photo to remember it.

Don’t underestimate the background

Even though you’re shooting street photography at night, this doesn’t mean that everything will be pitch black. There will be light elements in the background of your photo, such as people walking by or cars passing by. While the main subject is what you primarily want to focus on, the background is equally important for the result. Often, a poorly composed background can ruin a photo.
After finding your subject, work on developing your scene. I know that there isn’t always enough time when it comes to street photography, let alone night street photography. However, it is always advisable to maintain a presentable background. On the other hand, an interesting background can make a dull photo look more visually appealing.
I added one of my (rare) black and white street photos to show you how a rather dull image can look better. The man walks outside a store. Now, imagine the same photo without the lines. Wouldn’t it look boring? The lines surrounding him contribute to the mood, and they, of course, illuminate his face. Plus, his surprised expression adds a bit more drama.
One camera, one lens -leave everything else at home
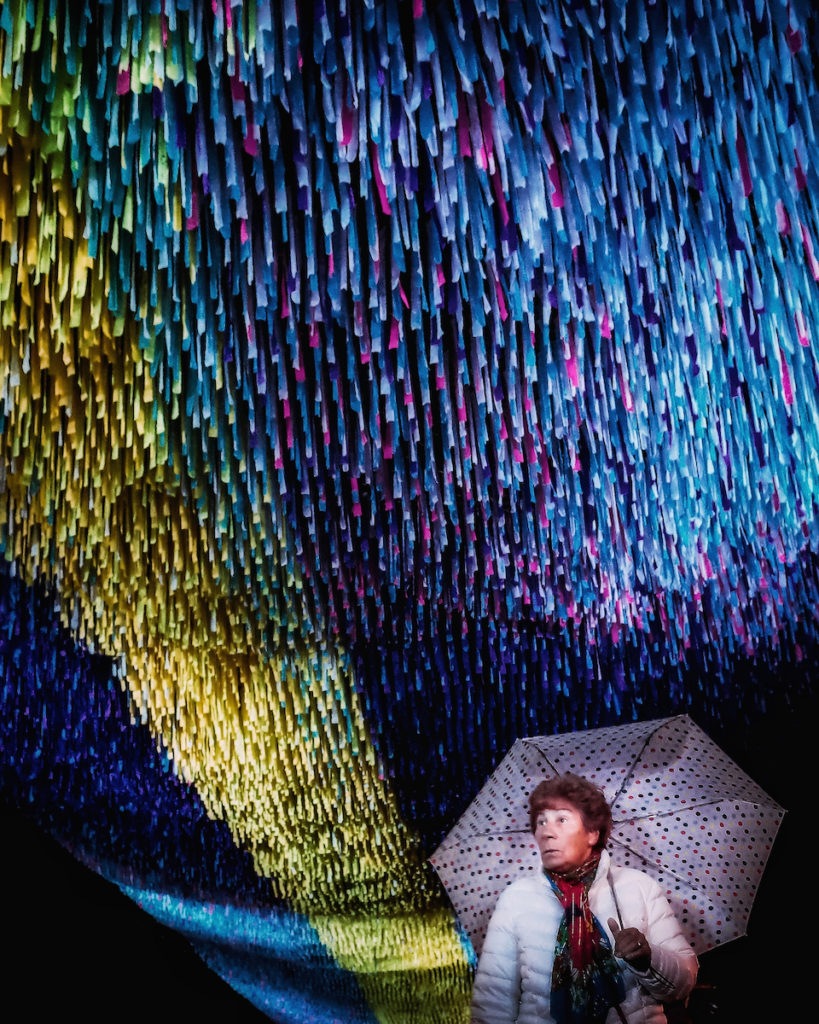
Now, if you follow my blog for a while, you know that I shoot almost exclusively with the Ricoh GR ii. This is my favorite camera (see my review here) for several reasons: it’s lightweight, it goes unnoticed, and it produces sharp images. Now, this doesn’t mean that everybody has to shoot with a small compact camera. On the contrary, the best camera is always the one that suits your needs.
However, what I want to highlight here is something else. When doing street photography at night, it’s best to have one camera and one lens with you. Don’t bring different lenses for different occasions, as changing lenses takes time, and you’ll lose the moment. Additionally, please refrain from bringing a tripod with you. Apart from the extra weight, you’re not shooting night street photography to have the sharpest images. You’re about to document life at night, and this often means photos that aren’t sharp, but they have a charm.
Having only one lens and one camera means you’ll also have to work more on your scenes. You’ll understand the limitations of your device, and you’ll start being more creative. I’m a fan of prime lenses (the Ricoh comes with a 28mm f/2.8 lens), but if you prefer zoom lenses, feel free to opt for those instead. But have just one lens and focus more on night street shots. Additionally, there’s a significant benefit: you won’t draw attention to yourself.
The street photo I present here is actually one of my favorite ones. I took it during the celebrations for the 30th anniversary of the Fall of the Berlin Wall. There was an impressive installation at the Brandenburg Gate, and I waited for more than an hour for this shot. I wanted an interesting face together with the installation. I kept shooting photos (I probably have another 60), and I insisted on having just my small Ricoh with me.
Bonus: Try to take photos of famous people

Now, this one is not exactly a tip for doing street photography at night, and that’s why it’s my +1 tip. If you feel shy about shooting night street photography, consider attending an event where a famous person (or more) will be present. The main idea behind this tip is that these individuals are aware they will be photographed.
Of course, this doesn’t mean that you can be around them for an hour or two, but you can practice how to approach them, from which angle to take a candid portrait, etc. Furthermore, such events usually take place indoors (so that’s not entirely night photography), which means there will be adequate lighting as well. Therefore, you can use such opportunities to experiment in a nighttime photography setting where a) the light is likely good and b) you can get closer to your subject.
The photo of Tilda Swinton above was taken during a Berlinale screening. She was there for the world premiere of a movie, and after the screening, I had the opportunity to get very close to her. I’m probably an arm away (and she’s a great person as well).
The best camera settings for shooting street photography at night
No guide to night street photography is complete without a separate section about the camera settings. While the way you approach your subjects matters the most, it’s equally important to discuss the optimal settings.
First of all, it’s better not to use the Auto mode of your camera. The main reason is that you want to have full control over your camera. If you use the Auto settings, the camera will expose the image without caring about its limitations or artistic needs. That said, the camera might choose a very high ISO, which will result in a very noisy photo that cannot be corrected in post-processing. Moreover, both the shutter speed and the aperture may not meet your needs.
I’ll break down here how I use my camera 99,5% of the time when I do street photography at night. This will give you an idea, but feel free to experiment as well.
ISO
I never shoot night street photography with anything less than ISO 1600. In fact, and depending on the camera I shoot, I might go up to ISO 6400. For my taste (and for my camera), anything more than that’s usually unusable. The digital noise is simply too much. A high ISO will also help you to get a faster shutter speed. And that’s a must at night street photography, especially if you want to catch moving subjects (people, cars, etc.).
So, set your ISO to 1600, and depending on your camera, try an ISO 3200 or even the ISO 6400 as well. And if you post-process your photos, use the noise reduction tool to make your images more presentable.
Aperture
Here, everything is pretty straightforward. Since I don’t shoot at night from that far away, I always go for the widest available aperture. The f/2,8 of my Ricoh is my to-go aperture. Zone focusing at night is rather challenging, but even if I try, there’s no chance of achieving f/8. The narrowest I could go with the Ricoh (and every other camera) is f/5,6. But I usually stay as wide as possible, mainly because I don’t want to sacrifice shutter speed.
Shutter speed
When doing street photography at night, the shutter speed will define if you have (wanted or unwanted) motion blur. In general, I never shoot with anything slower than 1/30. Unless, of course, I want to have a photo, or any other record. Otherwise, I try to remain at 1/30 and increase it as much as possible. But, to be honest, I never used anything faster than 1/125 at night.
If you shoot at 1/30, remember to hold the camera with both hands, minimize movement, and take a deep breath before taking the shot. That’s what I do to get the sharpest result.
Quick settings for street photography at night
Aperture: f/1,8 up to f/5,6
Shutter Speed: 1/30 up to 1/125
ISO: 1600 up to 6400
Note: Why I don’t use aperture priority mode.
Aperture priority mode is a very common choice among street photographers. In this mode, you practically set your aperture and let the camera decide on your shutter speed. However, I’m not a big fan of Aperture priority because I want to have more control over the camera settings. When shooting street photography at night, you need, for example, the best shutter speed you can get. Or, you might want an underexposed image on purpose.
With Aperture priority mode enabled, the camera will attempt to expose the photo perfectly. And that might be an issue for artistic expression. You can, of course, use the exposure compensation wheel to adjust the exposure by +1 or -1, but then again, you still let the camera set the shutter speed. That said, I rarely use this mode.
It might be easier to take photos, yes, but having full control of the camera is more important for me.
The best cameras for night street photography
As people often say, the best camera is always the one you have with you. The same applies to nighttime street photography. I don’t believe that there’s only one camera for people into street photography. I truly believe that each one should shoot with a camera that they feel comfortable with. There’s a wide range of cameras, from tiny compacts to bulky DSLRs, to choose from, and if they motivate you to shoot, you don’t need a newer or better one.
Despite shooting with different cameras throughout the years, I never had Gear Acquisition Syndrome (the so-called GAS). Occasionally, I might buy a camera or borrow one. All that said, if you already have a camera with a manual mode that feels good in your hand, don’t buy a new camera.
The cameras shown below are designed for individuals who prefer to move around with minimal weight. That’s my general shooting style, and I prefer to go unnoticed when doing street photography at night. A fast lens is what matters most to me, and when combined with a lightweight body, I have all I need.
So, here’s my selection, narrowed down by price range.
The cheap ones
I use the Ricoh GR II for running this blog and for the majority of my street photography. The Ricoh GRs are lightweight cameras with sharp lenses. They have a focal length of 28 mm, an APS-C sensor, and an f/2,8. In low-light situations (such as night shots and interiors), they feel a bit slow, though. I usually don’t exceed the ISO 1600 because the digital noise gets intense. For people on a tight budget, a Ricoh GR or a Ricoh GR II might be the optimal solution. And there’s, of course, the newest model, the Ricoh GR iii, which is slightly pricier but still affordable.
The mid-range ones
In this category, I’ll add the Fujifilm X100 series. These 35mm compact cameras with the APS-C sensor instantly became a street photographer’s dream. The lens is very sharp, and with an aperture of f/2, it produces excellent results at night. The Fuji X100 series may not be as lightweight as the Ricoh, but its colors are great, and it produces stunning images. You can see the prices and availability of these Fuji cameras here: Fuji X100V and Fuji X100F.
Alternatively, if you are a fan of mirrorless cameras, you can also consider the Sony a6000 series. I use the Sony a6300 camera extensively for several projects, and even with the kit lens, the results are awesome. If you’d like to have a mirrorless Sony for night street photography and you don’t want to shoot with the kit lens, consider either a prime lens like the Sony 35 mm f/1.8 or a versatile zoom lens that covers enough focal lengths, such as the 24-70 mm f/4.
Tip: Avoid buying multiple lenses. You’ll most likely end up shooting with just one of them, and the rest will stay at home.
The expensive ones
Now, here everything goes. Nowadays, you can easily spend 30,000 $ and still be unhappy with your selection. However, as I mentioned earlier, I prefer more compact cameras for my nighttime wanderings. From the cameras mentioned here, that’s actually the one that I have never used so far. I would love to buy one, but unfortunately, I am unable to afford it. If money is not an issue for you, you can consider it.
I’m talking, of course, about the Leica Q series. This is a state-of-the-art camera, still compact but heavier than its predecessors. The colors of the Leicas are always stunning, and the Q series can shoot easily with an ISO 6400. It also features a 28 mm lens, similar to the Ricoh, but this is a full-frame camera with an impressive f/1.7 lens. Compare the prices and availability of the Leica Q and the Leica Q2 for yourself.
Street photography at night: An Epilogue
Shooting street photography at night is a challenging endeavor. Apart from the best camera settings, there are several other factors to consider. Presenting a place’s life at night, taking candid photos of strangers, and deciding on the area you want to document are all things that will require some skills that you will only develop over time. Add to that your camera’s limitations (every camera has its limitations), and you have a fascinating but daunting subgenre of photography.
It goes without saying that one should always be careful when doing night street photography. It might sound like a cliche, but the night has its own rules and its own figures. Don’t raise your camera if you feel uncomfortable for any reason. It’s better to lose a photo than to fight. Your safety comes first, and no photo is worth risking damage to your gear or yourself. Be thoughtful and avoid taking silly risks.
And the most important thing of all: enjoy your journey through the night.
More street photography: Light and shadow street photography, The Glaswegians, Berlin street photos
Pin it for later
Did you enjoy reading about Street photography at night? Feel free to share this post with your friends.
Hey George,
Really loved going through all the points. Even though I could not yet manage to understand them all but I guess I will understand more when I actually apply them on the street. This is the kind of post that I have bookmarked for future reference (because I know it will slip my mind easily).
Hello dear Pooja.
Thanks for the kind words. Indeed, it’s always better to implement everything while being on the street. I guess it takes trial and error until you figure out what works for you and what doesn’t. But it’s fun being out and about at night, and shooting street photography is always great for documenting the scenes taking place in front of your eyes.
Happy shooting!